
4C'S LEARNING CENTER
Be confident you're getting the best diamond for your money. Here you'll find unbiased information to help take the anxiety
out of this exciting time. We don't buy or sell diamonds and we don't get commissions for recommending certain retailers.
Be confident you're getting the best diamond for your money. Here you'll find unbiased information to help take the anxiety out of this exciting time. We don't buy or sell diamonds and we don't get commissions for recommending certain retailers.
Instructional Diamond Grading
HOW TO ESTIMATE DIAMOND CARAT WEIGHT
DIAMOND COLOR GRADING INSTRUCTIONS
DIAMOND CLARITY GRADING INSTRUCTIONS
DIAMOND CUT GRADING INSTRUCTIONS
This calculator can be used to estimate the approximate carat weight of a mounted diamond. Using a millimeter gauge, measure the length, width and depth of your stone. Jewelers and appraisers use digital gauges made specifically for measuring gemstones. Then input the measurements into the calculator below or use the formulas provided. Make adjustments for thick girdles or other shape variances (girdle correction % and weight correction %).
When you need to know a diamond’s exact weight, unmount it and weigh it on carat weight scale. If you’re making an important financial decision about your diamond, have a professional unmounted it and examined it when it is loose.
Diamond Carat Weight Estimation Calculator
Diamond Weight Calculation Formula
Approximate Estimated Carat Weight = Length x Width x Depth x Shape (SF) x Girdle Correction Factor (GC) x Weight Correction Factor (WCF)
Approximate Estimated Carat Weight :
Diamond Carat Weight Estimation Formulas
ROUND BRILLIANT
Average Diameter 2 x Depth x 0.0061 x Girdle Correction %
PRINCESS CUT
Length x Width x Depth x 0.0082 x Girdle Correction % x Weight Correction% = Approximate Estimated Carat Weight
ASSCHER STEP CUT
Length x Width x Depth x 0.0080 x Girdle Correction % x Weight Correction% = Approximate Estimated Carat Weight
CUSHION BRILLIANT
Length x Width x Depth x 0.00815 x Girdle Correction % x Weight Correction% = Approximate Estimated Carat Weight
HEART BRILLIANT
Length x Width x Depth x 0.0059 x Girdle Correction % x Weight Correction% = Approximate Estimated Carat Weight
TRILLION BRILLIANT
Length x Width x Depth x 0.0057 x Girdle Correction % x Weight Correction% = Approximate Estimated Carat Weight
MARQUISE BRILLIANT
Length x Width x Depth x 0.00565 x GC % x WC% (1½ : 1 ratio)
Length x Width x Depth x 0.0058 x GC % x WC% (2 : 1 ratio)
Length x Width x Depth x 0.00585 x GC% x WC% (2½ : 1 ratio)
PEAR BRILLIANT
Length x Width x Depth x 0.00615 x GC % x WC% (1¼ : 1 ratio)
Length x Width x Depth x 0.0060 x GC % x WC% (1½ : 1 ratio)
Length x Width x Depth x 0.00575 x GC% x WC% (2 : 1 ratio)
OVAL BRILLIANT
Length x Width x Depth x 0.00625 x GC % x WC% (1¼ : 1 ratio)
Length x Width x Depth x 0.0064 x GC % x WC% (1½ : 1 ratio)
Length x Width x Depth x 0.0067 x GC % x WC% (2 : 1 ratio)
EMERALD STEP CUT
Length x Width x Depth x 0.0092 x GC % x WC% (1½ : 1 ratio)
Length x Width x Depth x 0.010 x GC % x WC% (2 : 1 ratio)
Length x Width x Depth x 0.0106 x GC % x WC% (2½ : 1 ratio)
RADIANT BRILLIANT
Length x Width x Depth x 0.0081 x GC % x WC% (1 : 1 ratio)
Length x Width x Depth x 0.0084 x GC % x WC% (1½ : 1 ratio)
GIRDLE CORRECTION ADJUSTMENTS
Formulas above are for diamonds with THIN - MEDIUM girdles, add % below for thicker girdles
ROUND BRILLIANT (below 1.25cts):
Slightly Thick 2-3% • Thick 3-4% • Very Thick 6-9% • Extremely Thick 8-12%
ROUND BRILLIANT (above 1.25cts):
Slightly Thick 1-2% • Thick 2-3% • Very Thick 4-6% • Extremely Thick 6-8%
FANCY SHAPES
Slightly Thick 3-4% • Thick 5-7% • Very Thick 9-10% • Extremely Thick 11+%
WEIGHT CORRECTION ADJUSTMENTS
Squarish or High Shoulders
Pear +1% to +5%
Oval +1% to +10%
Wide or Fat Wings
Pear +1% to +5%
Marquise +1% to +10%
Large Culet
All Shapes +1% to +2%
Wide Corners
Emerald -1% to -5%
Radiant -1% to -5%
Pavilion Bulge
Emerald, Radiant & Trillion +1% to +15%
Color grading
Diamond Color Grading involves determining how little or how much body color is in a diamond. The less body color, the higher the grade; the more body color, the lower the grade. This
process is about deciding the amount of color, or more accurately, the lack of color in a diamond.
Using special set of comparison diamonds, known as ‘Masters’, gemologists find the closest color match from among the Masters to the stone being graded. Each ‘master’ is the highest of each grade.
Diamonds are studied in the table-down (or bottom-up) position to determine the quantity of color. This means that graders view the diamond's pavilion and culet rather than its table or crown. Why? To eliminate interfering brilliance and glare coming from the diamond's top.
Step-by-step Diamond Color Grading Procedure
- Use a precision Master Set of known color diamonds. Each Master Diamond should be the highest of each grade. For example, the ‘F’ Color Master is the highest possible 'F'. This is because each color grade is a range and having consistent Masters is essential to accurate, reproducible results. Investing in diamonds that are certified as a Color Master Set is a good idea for professional gemologists.
- Arrange Master Set from the highest color to lowest color; left to right
- Begin by placing the diamond being graded to the left of the entire Master Set to get a general idea of the color
- Then move the diamond to the right of the Master Diamond that is close in color but a bit more saturated than the diamond being graded
- If the diamond being graded is the same color as the Master, then that is the color grade.
- If the diamond being graded is the lighter than the Master, then compare to the next higher color Master until the diamond being graded is no longer lighter than the Master
- Continue to compare the diamond to the known Master Diamonds until you determine the exact color.
- Remember to always position the unknown to the right of each master. Comparing the diamond being graded in between two masters is not recommended.
What is the 'Master-Eye effect'?
This relates to the fact that most people have one eye that is stronger than the other, which creates a slight deviation in color perception. Essentially, a diamond appears darker in one
position than another - even though the color is exactly the same. In effect, when a diamond is placed on the left of a Master Diamond it appears slightly darker than when placed to the
right (it may be the opposite case with you, depending on which of your eyes is stronger). This is why we always position the diamond being graded (the unknown) to the right of the Master
Diamond it is being compared to. Consistency in procedure results in accurate grades.
Color grading tips
- Make sure the Master Set of diamonds and the unknown diamond being graded are clean.
- Arrange the Master Diamonds from highest color on the left to lowest color on right.
- Start by comparing the unknown diamond to a lower color master and work your way to higher color masters (right to left) until the unknown is no longer lighter than a master stone.
- Position the unknown to the right of each master for consistent results.
- Comparing the unknown in between two masters is not recommended.
- The unknown diamond must be lighter than the master to be a better color than the master.
- Brown diamonds of any range are very difficult. Give them, and your eyes, more time to adjust to the light.
- It is difficult to see the true body color of diamonds with black inclusions. Try viewing these diamonds in the 'umbrella' position.
- Always view the Master Diamond in the same position as the unknown diamond.
- Magnifying eyewear is extremely helpful and is necessary if the diamonds appear a little blurry.
Table down, face up, or umbrella position?
Although diamonds are usually positioned table down when color grading, the umbrella position is sometimes used. To position diamonds in the umbrella view, they should be on their side,
slightly angled and diagonal to the grader's line of sight.
The umbrella position is very helpful to check and verify a grade decision, especially for fancy shapes, brownish colors, diamonds with dark inclusions, or uneven color distribution. Checking in this view is also useful for diamonds that are hazy or have limited transparency, strong fluorescence, or bruted girdles.
If the unknown diamond is close to, or the same color as, the Master Diamond when in the table down position, then check them in the umbrella view. If the unknown is better than the master in the umbrella position, than the final color grade will be the better color grade.
Clarity grading
Diamond Clarity Grading involves determining the degree to which a diamond is free of blemishes and inclusions. It is the process of hunting down microscopic imperfections and rating them
for difficulty of discovery. The more difficult it is to find inclusions under 10x magnification - using a binocular microscope - the higher the clarity grade. Once these specks are found,
their number, size and location all play a role in deciding the final clarity grade.
Gemologists use an 11-grade scale - from 'FL' (Flawless), the highest, to 'I3', very noticeable inclusions - to grade clarity. Each grade down represents increased ease of detection. In short, grades stand for degrees of visibility.
The clarity grading environment
Grading a diamond in a laboratory environment is the ideal way to examine a diamond. Professional diamond laboratories, like GCAL, invest in high quality binocular microscopes, work in
quiet darkened environments and have the advantage of examining perfectly clean loose diamonds. Gemologists and appraisers in the field often do not have these advantages.
Diamond clarity grades are always determined by what is visible at 10x magnification, not higher. Professional gemologists first examine the diamond with a microscope and then finalize the grade with a 10x loupe.
Clarity grading procedure
Here we are presenting grading procedures and principals we use every day in our laboratory.
- Clean the diamond. Never touch the diamond with your fingers while grading.
- With tweezers, hold the diamond in the face up position and examine under 10x microscope. If there are inclusions present, determine if they are VS1 and above, or VS2 and below.
- If it is VS1 or above, turn the stone over and check the culet area. Inclusions are commonly missed in this area. Then, hold the diamond in the table-to-culet position and examine the pavilion for inclusions while slowly spinning the diamond. Look through the pavilion 2-3 times, and then once again through the crown.
- It is more accurate to keep the diamond stationary (in tweezers or stone holders) and use the focus knob to look in and out of the diamond. The focus knob is much more delicate then your hands moving the diamond. Always be aware of the area coming into view as you concentrate on the area in front of you. And always be aware of the areas that have a black background. If it is VS2 or below, examine the pavilion for surface reaching inclusions.
- Once inclusions have been found in the microscope, examine the diamond under a 10x loupe and make a final grading decision.
-
Always consider these 5 factors when establishing a clarity grade:
- Size of Inclusion(s)
- Number of Inclusion(s)
- Position of Inclusion(s)
- Nature of Inclusion(s)
- Color/relief of Inclusion(s)
- Clarity Grading Tips
The '4-position' method for deciding borderline clarity calls
After viewing the diamond in the microscope for all clarity characteristics, the grader will have an opinion of what the grade will be through the microscope view. This view is just used
as a reference.
The final grade will ALWAYS be determined by the way the diamond appears through a 10x power loupe.
- Using a 10x loupe, view the grade setting inclusions, in four positions. Twelve o'clock, six o'clock, three o'clock and nine o'clock.
- Make four clarity decisions, one for each clock position.
- Like in baseball, a tie goes to the runner, meaning a tie goes to the benefit of doubt. The lower grade needs to be the majority look, not an even split. For example, if you see SI2 in two directions and I1 in two directions, then the final grade is SI2.
The 'theoretical grading' method
After locating all the grade setting inclusions, make the grade call that you think is correct. Then look at the grade setting inclusions again and mentally change what you are seeing.
Then consider if your grade decision still makes sense. For example, mentally move the crystal from the center of the diamond to the edge, or change a crystal from dark to light, or
eliminate some of the inclusions that contributed to the grade.
Consider how you would grade the clarity with the inclusions in a new location, etc. Can you justify your original decision?
How to grade transparent feathers and knots
- First, make a determination as to the clarity grade of the feather's size as if size was the only factor, and disregard where it is.
-
Next view the feather in a face up position, and make a clarity decision based only on the face up view. Forget that it is a feather; just view it as to how bright and how much of it
you can see.
- If you think size is SI2 and the visibility is SI1 or SI2, than the final grade is SI2.
- If you think size is SI2 and the visibility is VS2 or higher than the grade will be SI1, but never more than one grade higher than the nature grade.
- This will work with all feathers up to VVS2.
How to Grade High Clarities (VVS2 and better)
- Always carefully check the culet area for inclusions. Hold diamond girdle to girdle in the tweezers and inspect the culet area from the pavilion side.
- All possible grade setting inclusions have to be callable with a 10x power loupe. A pinpoint visible with the microscope at 10x but not visible with a 10x loupe is still considered to be Internally Flawless.
- It does not matter how many pinpoints are callable at 10x through the pavilion for the grade to still be VVS1.
- A diamond with naturals or extra facets anywhere on the diamond can still receive a grade of Internally Flawless. If a natural is indented, the diamond is graded VVS1 or below.
- White lines, scratches or pits are often incorrectly called grade setting inclusions that lower a grade below Internally Flawless. The key to making the correct decision is to view the depth or lack of depth from the opposite side of the blemish at 10x power.
- The most difficult and misunderstood high clarity characteristic is internal graining.
Types of graining
- Graining is caused by distortions in the atomic crystal structure. Graining is commonly overlooked and misunderstood. It is often the grade setting clarity characteristic in VVS quality diamonds. Remember, to be considered graining, it must be loupe-able just as it is seen in the microscope. Here are some types of graining:
- Reflective graining looks like a frozen sheet of saran wrap extending into the diamond and is associated with surface grain lines.
- Surface graining is the easiest to see but will only lower the grade to IF.
- Colored graining, most commonly brown, pink or green, looks like colored lines running through the diamond and is best seen when viewed in diffused white light.
- Whitish graining is the most difficult to define, but can be described as white lines, white bands, smoke, rain, or shimmering lines. It usually disappears easily and is best seen at exaggerated viewing angles.
Water Grading
Water grading is a technique that some graders prefer because it quickly removes surface dust and assists looking into the diamond.
- To water grade, add a few drops of liquid Joy detergent to a jar of water and use a brush applicator.
- The wet brush is used in place of a pointer to remove dust and rotate the diamond in the stone holders.
-
If you decide to give water grading a try, here are a few things to remember:
- Water grading is most efficient for low clarities, but difficult with mounted diamonds
- The drying water leaves a film that can interfere with accurately seeing the diamond
- It is hard to loupe when using water
- High clarity inclusions and polish features are missed when water grading.
- Water grading distorts facet shapes when judging symmetry
Clarity grade descriptions
The following are examples of the types of inclusions and comments about each clarity grade.
Flawless
No internal or external Inclusions at 10 power.
No blemishes, surface graining, extra facets, polish lines, scratches or naturals at 10 power.
Naturals totally confined to the girdle can be Flawless.
Excellent polish does not guarantee Flawless but a Flawless diamond has to have excellent polish.
Internally Flawless
No internal or external inclusions at 10 power.
Any polish grade, symmetry grade, color grade or type of proportion can obtain an IF grade.
Extra facets, naturals, surface grain lines, polish lines, scratches, abrasions, and pits are acceptable.
VVS1
- Internal inclusions such as: Pinpoints, clouds, needles, or callable internal graining only visible through the pavilion.
- Surface reaching inclusions such as: Bruises, chips, feathers and indented naturals not visible face up.
- Bearding on pavilion side.
VVS2
- Inclusions loupe-able face up, such as: Pinpoints, clouds, needles, callable internal graining.
- Surface reaching inclusions, such as: Bruises, chips, feathers and indented naturals that are loupable face up.
- Diamond should be louped without exaggerated tilting.
VS1
- Small to very small crystals of a limited number.
- Small clouds of a limited number. Density matters.
- Small to medium needles of a limited number.
- Small feathers of a limited number.
- Medium sized feathers slightly visible face up.
- Medium sized bruises of a limited number.
- Small chips of a limited number.
- Small indented naturals around the girdle.
- Usually only white inclusions.
- Numerous reflecting pinpoints.
VS2
- Small crystals numbering no more than three or four.
- Medium size individual crystals.
- Medium size dense clouds.
- Light clouds throughout, visible face up.
- Slightly large, thicker needles of a limited number.
- Medium sized feathers visible face up. Orientation matters.
- Large feathers not visible face up nearest to the girdle edge.
- Slightly large sized bruises of a limited number.
- Medium sized chips of a limited number.
- Medium sized indented naturals around the girdle.
- Small black inclusions of a limited number.
SI1
- Medium to slightly large crystals, feathers and needles.
- Hazy diamonds due to clouds or whitish graining.
- Slightly large cavities, chips and indented naturals.
- Numerous VS2 sized inclusions.
- Numerous reflections of VS2 sized inclusions
- Very slightly eye-visible after louping and positioning inclusion in brightest location.
SI2
- Large feathers, crystals, black inclusions, numerous twinning wisps, large knots, and large dense clouds.
- Often look 'busy' with the loupe but when viewed with the naked eye only some/none of the inclusions are noticeable.
- Eye visibility varies with observer's.
I1
- Inclusions are easily visible to the unaided eye.
- Inclusions may affect transparency, brilliance and possibly durability.
I2
- Very easy to see with the unaided eye.
- Transparency and brilliance is significantly diminished.
- Inclusions may impact the durability of the diamond.
- Approximately ¼ to ½ of the diamond lacks transparency.
I3
- Extremely visible to unaided eye.
- Inclusions may significantly impact the durability of the diamond.
- More than ½ of the diamond lacks transparency.
Grading polish
'Polish' describes the quality of the facet surfaces and is related to the luster of a diamond. It can also be described as how free a diamond is from scratches. A high quality polish
requires the diamond cutter to pay meticulous attention to the final stages of cutting.
Polish is graded as: poor, fair, good, very good and excellent. The majority of diamonds manufactured by modern cutting technology have at least good polish.
When judging a diamond’s polish quality, graders tend to start off with the grade of ‘good’ in their mind and then look for reasons to grade ‘very good’, ‘excellent’ or ‘fair’; but this is not the correct mentality. It is better to start off thinking ‘excellent’ and then find specific reasons to justify a lower grade. Remember, the diamond is innocent until proven guilty.
Polish grade descriptions
Each polish grade has a range. Here are examples of what you can expect to find for each grade:.
- EXCELLENT: minor areas of facets with some light polish features
- VERY GOOD: light polish lines on several facets
- GOOD: burnt facets, numerous facets with transparent or white polish lines, numerous abrasions, at least one full facet of moderate polish lines
- FAIR: many facets that appear frosted due to heavy burns or many with very heavy white and transparent lines that can give the diamond either a cloudy look or a heat wave look
- POOR: polish is rare but occurs when the overall diamond is difficult to see through numerous facets and is very visible to the unaided eye
Grading external symmetry
External symmetry is a physical quality grade judged by a gemologist examining the exterior of a diamond under a microscope. It assesses the shape and alignment of facets. External
symmetry is graded as: poor, fair, good, very good and excellent.
This should not be confused with optical symmetry, which is a grade of how well the diamond handles light as judged through digital imaging. It assesses the consistency of angles and alignment of facets by looking at the equality of light return.
As with judging a diamond's polish, when judging a diamond’s external symmetry graders tend to start off with the grade of ‘good’ in their mind and then look for reasons to grade 'very good', 'excellent' or 'fair'; but this is not the correct mentality. It is better to start off thinking 'excellent' and then find specific reasons to justify a lower grade. Remember, the diamond is innocent until proven guilty.
Here are some things to look for when grading a diamond’s external symmetry:
- When judging round brilliant cuts, start by checking the overall symmetry of the diamond by placing the diamond in the iris diaphragm and slowly rotating it while looking at the roundness of the outline, the perfectness of the octagonal table and centering of the culet. Then, look for the alignment of pavilion mains to crown bezels, look for open or short facets, compare the widths of the pavilion mains, and compare the shapes of the bezel facets.
- When grading fancy shapes, give them some leniency compared to round brilliants. Focus on judging the symmetry and not the aesthetic shape. Check the symmetry of the outline and then look for the alignment of pavilion mains to crown bezels, look for open or short facets, compare the widths of the pavilion mains, and compare the shapes of the bezel facets.
Judging girdle thickness
The widest part of a diamond, between the crown (top) and pavilion (bottom) is called the ‘girdle’. The thickness of the girdle is assessed as a range and described as: extremely thin,
very thin, thin, medium, slightly thick, thick, very thick, and extremely thick.
Many graders are uncertain about assessing girdle thickness. Girdle thickness is important because it is part of the overall proportion grade and it is a factor in weight estimation of mounted diamonds.
Here are a few pointers:
- When judging brilliant cuts, measure the concave areas (aka the valleys) of the girdle rather than from peak to peak.
- Square and rectangular cut are measured around the entire girdle, including the points. If the corners are missing the facet edge and come to a point, this is considered extremely thin.
- Do not measure the cleft area of heart shapes, as this will always be extremely thick.
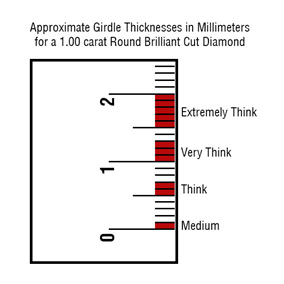
- If you are going to directly measure the girdle in millimeters, remember that the measurement in mm is proportional to the size of the diamond. For reference a medium girdle for a 1.00 carat diamond usually measures about 0.10mm. This image shows a magnified millimeter gauge and the girdle descriptions for approximate millimeter thicknesses for a 1.00 carat round brilliant cut diamond.